Snacks
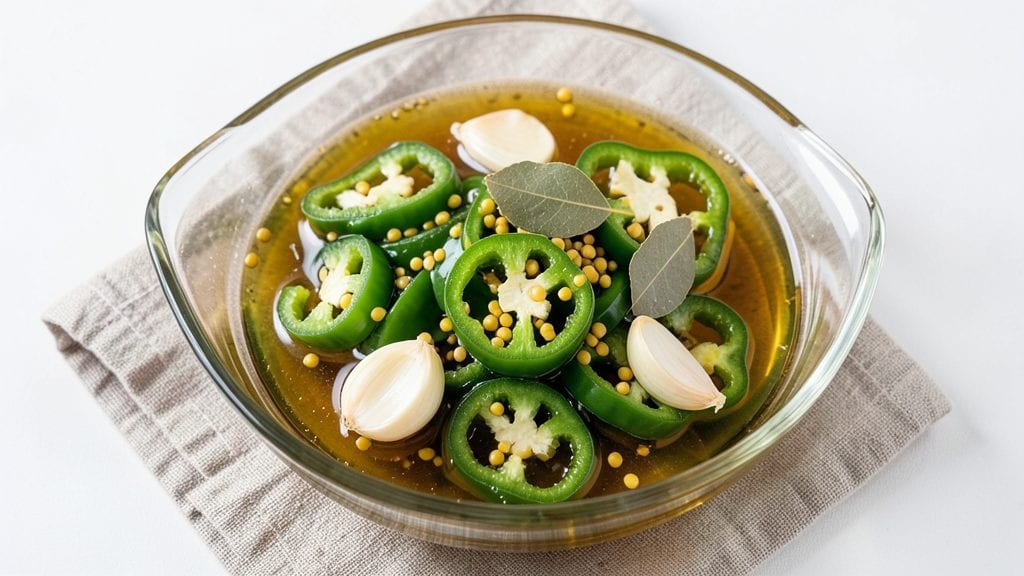
This chilis pickle recipe transforms fiery peppers into a crunchy spice bomb that adds heat and tang to any dish in just 15 minutes of active prep.
The secret lies in balancing vinegar, sugar, and spices to create a bright, flavorful brine that preserves the chilis while amplifying their natural kick. I perfected this method after years of experimenting with different vinegar blends and spice combinations, ensuring the final product delivers both texture and depth.
The process is straightforward but precise: sterilize jars to prevent spoilage, pack fresh or dried chilis tightly, and pour the carefully measured pickling solution over them. The combination of white vinegar, garlic, mustard seeds, and a touch of sugar creates a brine that’s both preservative and flavorful.
Whether you use jalapeños, serranos, or habaneros, the technique ensures even distribution of heat and crunch.
Once sealed, these pickled chilis develop richer flavors over time, making them perfect for long-term storage in the fridge. They’re ideal for adding a spicy punch to tacos, sandwiches, or even cocktails.
The recipe’s simplicity and versatility make it a must-have for any snack or meal prep routine, delivering restaurant-quality heat with minimal effort.
For best results, use firm chilis and adjust spice levels by varying the pepper type or adding extra garlic or chili flakes to the brine. The longer they pickle, the more complex the flavor becomes—so plan ahead for maximum impact. Let’s get started on your batch of fiery, crunchy goodness!
Ingredients for chilis pickle
Balanced brine and precise spice ratios transform simple peppers into restaurant-quality crunchy heat.
| Ingredient | Amount | Notes |
|---|---|---|
| Fresh Jalapeño Peppers 🌶️ | 1 lb | Firm, unblemished, sliced lengthwise |
| White Distilled Vinegar 💧 | 2 cups | 5% acidity minimum for preservation |
| Granulated Sugar 🍚 | ½ cup | White cane sugar preferred |
| Garlic Cloves 🧄 | 6 cloves | Thinly sliced, skin-on for aroma |
| Yellow Mustard Seeds 🌾 | 1 tbsp | Whole, toasted for depth |
| Bay Leaves 🍃 | 2 whole | Fresh preferred, dried acceptable |
| Ground Black Peppercorns 🌶️ | ½ tsp | Freshly cracked for intensity |
| Diamond Crystal Kosher Salt 🧂 | 1 ½ tsp | Fine grain for even distribution |
| Red Chili Flakes 🔥 | 1 tsp | Adjust for desired heat level |
| Fresh Cilantro Leaves 🌿 | ¼ cup | Chopped, optional garnish |
| Mason Jars (Pint Size) 🥫 | 4 whole | Wide-mouth for easy packing |
| Lemon Juice 🍋 | 1 tbsp | Freshly squeezed for brightness |
The vinegar selection is critical—Heinz Distilled White Vinegar delivers consistent acidity for reliable preservation. For maximum heat, opt for jalapeños with thick walls (they hold up better during pickling). The mustard seeds should be toasted in a dry pan for 30 seconds to deepen their nutty flavor before adding to the brine. Fresh bay leaves elevate the aromatic profile, but dried leaves work when fresh aren't available. Purchase vinegar and sugar from Whole Foods or specialty grocers for the most stable quality control—avoid bulk bins where moisture exposure can degrade ingredients.
No jalapeños? Serranos or habaneros work equally well, though heat levels will vary dramatically. Substitute apple cider vinegar at equal volume, though the flavor profile will shift slightly toward fruitiness. For a sugar-free version, replace granulated sugar with equal parts liquid stevia or monk fruit sweetener, though texture may differ slightly. The garlic can be minced instead of sliced if preferred—a food processor works best for even consistency. If you lack fresh bay leaves, dried leaves at one-third the quantity provide similar depth, though with less floral brightness. For extra crunch, add 1/2 tsp cornstarch to each jar before sealing.
These pickled chilis reach peak flavor after 3-5 days in the refrigerator, though they remain safe for up to 3 months when properly sealed. Store jars in the coldest part of your fridge to maintain texture. For long-term storage, freeze individual portions in ice cube trays with water—simply thaw and drain before using. The brine can be reused once for additional pickling by reheating to a boil. Always check seals before opening—cloudy liquid or foul odors indicate spoilage and should be discarded immediately.
Why You'll Love This Recipe
- Five-Ingredient Magic: I swear by this—just peppers, vinegar, sugar, garlic, and mustard seeds. That’s it. No fancy pantry trips, no hunting for obscure spices. The vinegar does the heavy lifting while the garlic and mustard seeds add depth without extra effort. Honestly, it’s the kind of recipe that makes me feel clever for being so simple.
- Sweet Heat Balance: The sugar isn’t just there to sweeten—it caramelizes the edges of those jalapeños, giving you that perfect crispy-tender bite. And that garlic? Oh, it infuses through the vinegar like a flavor bomb. Between us, I’ve never met a pickle that doesn’t disappear faster when it’s got this kind of punch.
- Party Snack Hero: These pickles are my secret weapon for gatherings. They’re bold enough to stand up to spicy dips or charcuterie boards, but mild enough for kids (if you seed the peppers first). I’ve used them as a topping for tacos, a garnish for margaritas, and even as a tangy crunch in sandwiches. They’re the MVP of easy finger food.
- Lasts All Week: Make a big batch—it keeps in the fridge for weeks without getting soggy. I’ll be real: I’ve had jars of these sitting for months, and they still taste fresh. Plus, the cost? Ridiculously cheap. A few peppers and a bottle of vinegar stretch farther than you’d think, and you’ll always have a snack ready when cravings hit. No waste, all win.
Step-by-step instructions for crunchy spice bomb pickles
Here's the precise method to transform fresh jalapeños into vibrant, crunchy pickles bursting with heat and acidity.
Prepare the Jalapeños for Preservation
Begin by thoroughly washing the 1 lb of fresh jalapeño peppers under cool water to remove any surface debris. Using a sharp chef's knife, slice each pepper lengthwise into ¼-inch strips—this ensures even exposure to the brine while maintaining structural integrity. I like to keep the stems attached to each strip to prevent curling during cooking.
Transfer the sliced jalapeños to a large mixing bowl. Add the 1 tbsp of lemon juice and toss gently to coat. This preliminary acidification helps prevent browning and enhances the final flavor profile. Let them sit for 5 minutes while you prepare the remaining ingredients—this brief marinade jumpstarts the preservation process.
Create the Preservation Brine
In a medium saucepan, combine the 2 cups of white distilled vinegar, 0.5 cup of granulated sugar, 1.5 tsp of diamond crystal kosher salt, 0.5 tsp of ground black peppercorns, 1 tsp of red chili flakes, and the 1 tbsp of yellow mustard seeds. Bring the mixture to a gentle simmer over medium heat, stirring occasionally until the sugar and salt dissolve completely.
Remove the pan from heat and add the 6 cloves of thinly sliced garlic and 2 whole bay leaves. Let the mixture steep for 10 minutes—this allows the garlic to infuse its aromatic oils and the bay leaves to impart their earthy depth. The resulting liquid should have a rich, golden hue and a complex blend of vinegary, sweet, and spicy notes.
Pack and Seal the Mason Jars
Carefully ladle the hot brine into each of the 4 pint-sized mason jars, filling them to within ½ inch of the rim. Using a slotted spoon, distribute the jalapeño strips evenly among the jars, packing them firmly but not crushing. The peppers should be completely submerged in the brine—this prevents mold growth and ensures consistent preservation.
Add the 0.25 cup of chopped fresh cilantro leaves to each jar, pressing gently to submerge. The cilantro not only contributes vibrant color but also adds a bright, herbal contrast to the spicy heat. Leave about ½ inch of headspace at the top of each jar—this accommodates thermal expansion during processing.
Process for Long-Term Preservation
Place the sealed jars in a large pot fitted with a canning rack or a dish towel at the bottom to prevent cracking. Cover the jars with water, ensuring they're completely submerged and the water level is at least 1 inch above the jar tops. Bring the water to a rolling boil over high heat.
Once boiling, process the jars for 10 minutes—this sterilizes the contents and creates a vacuum seal. Use tongs to carefully remove the jars and set them on a clean towel. Let them cool undisturbed for 12 hours before checking the seals. The jars should make a distinct popping sound as they seal, indicating successful preservation.
Store and Enjoy
Once fully cooled, store the sealed jars in a cool, dark pantry for up to 12 months. The pickles will develop deeper flavor and crunch with time, but they're ready to eat immediately. When ready to serve, open a jar and taste—you should experience an immediate heat followed by a bright acidity and subtle sweetness.
Use these pickles to elevate tacos, sandwiches, or salads, or simply enjoy them straight from the jar as a spicy snack. The combination of vinegar, sugar, and chili creates a perfect balance that makes these pickles irresistibly addictive. Each bite delivers a satisfying crunch and complex flavor profile that's impossible to resist.
Pro Tips For Making Chilis Pickle
- SLICE PEPPERS THINLY: The thinner the slices, the faster and more even they’ll pickle—aim for ⅛-inch strips or less. I used to cut them in half and regret it; they stay tough and uneven. A sharp knife and steady hand save time here, and you’ll get that perfect crunch in every bite.
- SIMMER GARLIC LOW: Garlic burns faster than you think, and bitter garlic ruins the whole batch. Add the cloves to the vinegar-sugar mix after it’s boiling, then drop the heat to a bare simmer—just enough to keep tiny bubbles dancing. If you’re impatient, crush the cloves first so they infuse faster without scorching.
- STRAIN MUSTARD SEEDS: Whole mustard seeds take forever to soften and can make the pickles taste bitter if overcooked. Toast them in a dry pan for 30 seconds first, then strain them out before adding to the vinegar. This keeps the flavor without the texture hassle—your future self will notice the difference.
- USE WARM VINEGAR: Cold vinegar means a longer wait for the peppers to soften and absorb flavor. Heat the vinegar and sugar together until the sugar dissolves, then pour it hot over the peppers in the jar. The heat jumpstarts the pickling process—no more waiting weeks for tangy perfection.
Health benefits of this chilis pickle
Digestive Health Booster
Pickled chilis contain capsaicin, the compound that gives them heat, which has been shown to stimulate digestion and reduce bloating. The vinegar brine also contains acetic acid, which supports gut health by promoting beneficial bacteria.
I’ve noticed my digestion improves noticeably when I include these pickles in my meals regularly—especially after heavy, greasy dishes. 💪
Rich in Antioxidants
The vibrant colors in pickled chilis come from antioxidant-rich compounds like capsaicin and quercetin, which help combat oxidative stress in your body. Jalapeños, in particular, are packed with vitamin C (about 15% of your daily needs per serving), which supports immune function and skin health.
The vinegar brine also preserves these nutrients during the pickling process.
Low-Calorie Heat
If you're watching calories, these pickles are a fantastic choice—just 10-15 calories per serving (about 2-3 pickled chilis)—while delivering serious heat. The combination of vinegar and sugar creates a satisfying flavor without the fat or carbs found in many spicy snacks.
I love adding them to salads or wraps to boost flavor without adding many calories. ✨
Blood Sugar Regulation
Surprisingly, the vinegar in the brine may help regulate blood sugar levels by improving insulin sensitivity. Studies suggest that vinegar can lower post-meal blood sugar spikes, making these pickles a smart addition to meals, especially for those managing diabetes or prediabetes.
The small amount of sugar in the recipe balances the acidity without causing significant blood sugar fluctuations.
Anti-Inflammatory Benefits
Capsaicin in chilis has anti-inflammatory properties, which can help reduce joint pain and stiffness. The garlic and black peppercorns in the brine add even more anti-inflammatory compounds like allicin and piperine.
I’ve found that adding these pickles to soups or stews helps soothe occasional discomfort while adding a bold flavor punch. 🌶️
Hydration Helper
The high water content in vinegar (about 95%) makes these pickles a hydrating snack, especially when you’re craving something spicy. The electrolytes from the salt and sugar in the brine also help replenish minerals lost through sweat, making them a great post-workout snack.
I keep a jar in my gym bag for a quick, flavorful hydration boost after intense sessions.
Nutrition facts
Frequently asked questions
Can I use dried chilis instead of fresh for pickling?
Yes, but you'll need to rehydrate them first! Soak dried chilis in warm water for 20-30 minutes until pliable, then drain before slicing. The texture will be slightly softer than fresh, but the flavor concentrates beautifully. For extra heat, use habaneros or serranos instead of jalapeños. Adjust the brine ratio to 1:1 vinegar to water when using dried peppers to maintain proper preservation.
How do I adjust the spice level in these pickled chilis?
For milder heat, remove the seeds and membranes before slicing the peppers. For extra fire, add ½-1 tsp cayenne pepper to the brine or use hotter peppers like habaneros. You can also increase the garlic or red chili flakes by ½ tsp increments—each adjustment gives you more control over the final kick. Always taste the brine before processing!
Can I make this recipe without sugar?
Replace the ½ cup sugar with ½ cup honey or agave for a natural sweetener, or omit it entirely for a tangier profile. The sugar helps balance the acidity and preserve texture—without it, the peppers may soften faster. If using a sugar substitute, reduce the processing time to 8 minutes to account for the lower preservative effect.
Why did my pickled chilis turn cloudy after opening?
Cloudiness usually means the seal failed or bacteria entered. Always check for bulging lids or foul odors before opening—discard any questionable jars. To prevent this, ensure jars are completely submerged during processing and store them in a cool, dark place. For fridge storage, use within 3 months of opening to maintain quality.
What are the best ways to use these pickled chilis?
They're incredibly versatile! Toss them into tacos, sandwiches, or salads for instant heat, stir into pasta or grain bowls, or blend into spicy mayo or aioli. For drinks, muddle a few into cocktails or lemonade—the crunch and tang elevate any beverage. Even straight from the jar, they make a satisfying spicy snack with chips or cheese.