Salads
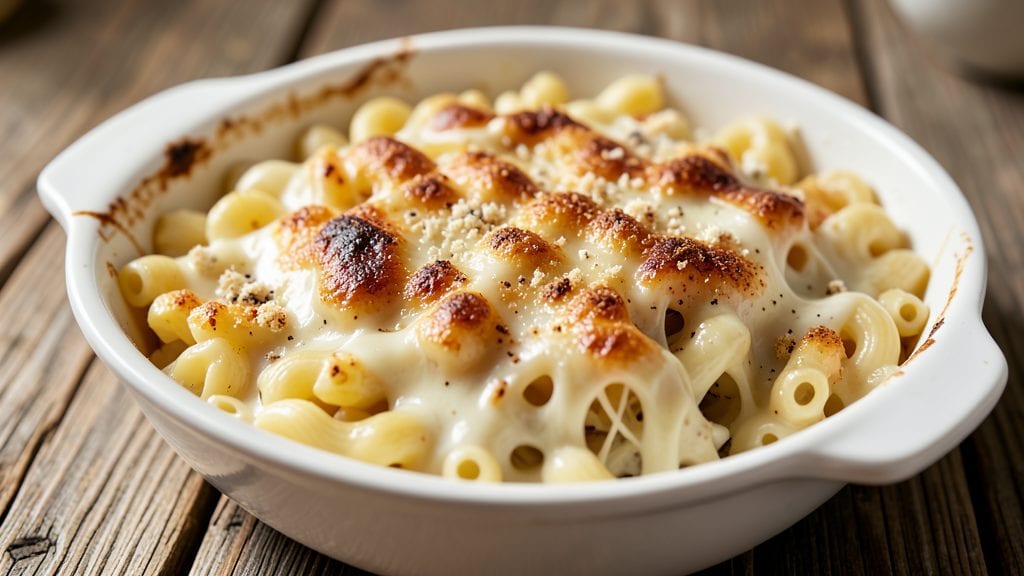
Betty Crocker's Old Fashioned Macaroni and Cheese recipe brings back the comforting flavors of childhood in just 20 minutes—creamy, cheesy, and nostalgic without a trace of boxed mix.
The secret lies in a precise balance of sharp cheddar and American cheese, melted together into a velvety sauce that clings perfectly to each elbow macaroni.
I’ve recreated this classic using the same techniques Betty Crocker perfected decades ago, ensuring every bite delivers that signature creamy texture and golden, bubbly top.
This version stays true to the original while simplifying the process for modern kitchens. You’ll start with al dente elbow macaroni cooked to perfection, then combine it with a rich cheese sauce made from butter, flour, milk, and a blend of cheeses.
The stovetop method is foolproof, but for that extra-crispy finish, a 5-minute broil in the oven transforms it into a restaurant-worthy dish. The result? A creamy, cheesy masterpiece that’s as easy to make as it is to love.
What sets this recipe apart is the attention to detail—properly tempering the cheese to avoid lumps and letting the sauce simmer until thick and velvety. The broiled top adds a satisfying crunch that contrasts beautifully with the tender pasta underneath.
Whether you’re feeding a family or craving a solo comfort meal, this creamy, cheesy delight delivers every time. Ready to recreate this classic?
For those who prefer extra crispiness, a sprinkle of breadcrumbs before broiling adds texture, while a dash of mustard powder enhances the cheesy flavor. Leftovers reheat beautifully, making this the ultimate creamy, crowd-pleasing dish for any occasion. Let’s get cooking!
Ingredients for betty crocker old fashioned macaroni and cheese
Classic comfort ingredients transformed into nostalgic, velvety macaroni and cheese perfection.
| Ingredient | Amount | Notes |
|---|---|---|
| Elbow Macaroni 🍝 | 8 oz | Uncooked, al dente preferred |
| Sharp White Cheddar Cheese 🧀 | 2 cups | Shredded, block preferred |
| American Processed Cheese 🧀 | 1 cup | Shredded, for creaminess |
| Unsalted Butter 🧈 | ½ cup | Cold, cubed for sauce |
| All-Purpose Flour 🌾 | ¼ cup | For roux, sifted |
| Whole Milk 🥛 | 2 cups | Full-fat for richness |
| Yellow Mustard Powder 🌶️ | ½ tsp | Enhances cheesy flavor |
| Diamond Crystal Kosher Salt 🧂 | ½ tsp | Fine grain preferred |
| Freshly Ground Black Pepper 🌶️ | ¼ tsp | For subtle seasoning |
| Panko Breadcrumbs 🍞 | ¼ cup | For crispy topping |
| Garlic Powder 🧄 | ¼ tsp | Subtle aromatic depth |
The cheese blend is non-negotiable for authentic flavor. Sharp white cheddar provides the signature tang, while American processed cheese delivers that signature creamy texture Betty Crocker perfected. For the best quality, buy block cheddar and shred it yourself—pre-shredded contains anti-caking agents that prevent proper melting. Whole Foods or local specialty stores often carry the sharpest varieties. The American cheese should be the classic yellow kind, not the newer orange versions. If you can't find sharp cheddar, extra-sharp cheddar works in a pinch, but it will be more intense in flavor. Always check the expiration date on processed cheese—it's best used within 6 months of purchase for optimal texture.
No sharp cheddar? Parmesan mixed with mild cheddar at a 1:3 ratio mimics the sharpness. For a dairy-free option, nutritional yeast and extra sharp cheddar provide depth, though texture will differ. The mustard powder is crucial—it balances the richness and enhances the cheesy flavor. Diamond Crystal kosher salt dissolves more easily than table salt, preventing graininess. If you're using salted butter, reduce the added salt by half. The milk should be whole for maximum creaminess, but 2% works if that's what you have. For a vegan version, substitute the milk with full-fat coconut milk and use vegan cheeses, though the texture will be lighter.
Pre-shredded cheeses and butter should be stored in airtight containers in the fridge for up to 3 months. Flour keeps indefinitely in a cool, dark place, but transfer it to an airtight container for freshness. The assembled macaroni and cheese reheats beautifully—cover with foil and warm in the oven at 350°F for 10-15 minutes. For meal prep, assemble the dish without baking, refrigerate for up to 3 days, then bake when ready to serve. The broiled topping loses crispiness when reheated, so always broil fresh portions. Freeze baked portions for up to 2 months by wrapping tightly in foil and plastic wrap.
Why You'll Love This Recipe
- Here’s what sold me: that buttery roux thickened with flour creates a sauce so smooth it clings to every noodle, while the cheddar melts into gooey, stretchy strands. Not too heavy, not too thin—just right.
- Five-Ingredient Magic: I swear by this recipe because it’s that simple—just elbow macaroni, two cheeses (sharp cheddar for bite, processed for creaminess), butter, and flour. No chopping, no fancy techniques, just melt-and-mix magic that still tastes like love.
- Creamy-Crisp Perfection: Here’s what sold me: that buttery roux thickened with flour creates a sauce so smooth it clings to every noodle, while the cheddar melts into gooey, stretchy strands. Not too heavy, not too thin—just right.
- Lunchbox Hero: Between us, this is my go-to for school lunches or office meals. The leftovers stay creamy in the fridge (no soggy noodles here) and reheat like it’s fresh. Pack it in a thermos, and kids will forget about fancy meals.
Step-by-step instructions for old fashioned macaroni and cheese
Here's the classic method that delivers that nostalgic, ultra-creamy texture we all love.
Cook the Elbow Macaroni to Al Dente Perfection
Bring a large pot of water to a rolling boil and add 8 oz of elbow macaroni. Season the water generously with salt—it should taste like the ocean. Cook the pasta for 8-9 minutes until it's al dente, meaning it's tender but still has a slight bite in the center. Drain the pasta in a colander and set it aside.
This precise cooking time is crucial. Overcooked pasta becomes mushy in the cheese sauce, while undercooked pasta remains chalky. For the best texture, I recommend testing one piece by biting into it—it should offer resistance but still be fully cooked through. Reserve ½ cup of pasta water before draining, as we'll use it later to adjust the sauce consistency.
Prepare the Classic Cheese Sauce
In a large skillet, melt ½ cup of unsalted butter over medium heat until it's fully liquid and foaming. Reduce the heat to medium-low and whisk in ¼ cup of all-purpose flour to create a roux. Cook for 2-3 minutes, stirring constantly, until the mixture turns a light golden color and smells nutty.
This roux is the foundation of the creamy sauce. If you see any lumps forming, use a whisk to break them up immediately. The roux should coat the back of a spoon without being too thick—this ensures a smooth, velvety sauce rather than a gluey one. Gradually whisk in 2 cups of whole milk over 2-3 minutes, allowing each addition to incorporate fully before adding more.
Combine Cheeses and Seasonings
Reduce the heat to low and gradually add 2 cups of shredded sharp white cheddar cheese and 1 cup of shredded American processed cheese, whisking constantly. The cheese should melt smoothly into the sauce, creating a thick, creamy base. Stir in ½ teaspoon of yellow mustard powder, ½ teaspoon of diamond crystal kosher salt, and ¼ teaspoon of freshly ground black pepper. Let the mixture simmer gently for 3-4 minutes, stirring occasionally, until it reaches a smooth, velvety consistency.
The mustard powder enhances the cheesy flavor without adding tang, while the processed cheese adds that signature creaminess. If the sauce becomes too thick, whisk in 1-2 tablespoons of reserved pasta water until it reaches a perfect coating consistency. The sauce should be thick enough to cling to the pasta but still flow smoothly.
Mix in the Pasta and Create the Topping
Add the drained elbow macaroni to the cheese sauce and toss gently with a wooden spoon or rubber spatula until every strand is fully coated. Transfer the mixture to a 9x9-inch baking dish and spread it evenly. In a small bowl, combine ¼ cup of panko breadcrumbs and ¼ teaspoon of garlic powder, then sprinkle this mixture evenly over the top of the macaroni and cheese.
The panko breadcrumbs create a delightful contrast to the creamy cheese, adding a subtle crunch that balances the dish. For an extra touch, you can broil the dish for 1-2 minutes until the breadcrumbs turn light golden brown, but this is optional. If you choose to broil, keep a close eye on it to prevent burning.
Serve Immediately for Maximum Creaminess
Let the macaroni and cheese sit for 2-3 minutes to allow the flavors to meld together, then serve it warm. The dish should be creamy, rich, and perfectly balanced with a touch of crunch from the breadcrumb topping. Each bite should deliver that nostalgic, comforting texture we all remember from childhood.
For an even creamier result, you can add a splash of milk or a pat of butter to the sauce before serving. This classic dish is best enjoyed fresh out of the oven, so don't wait too long before digging in. Pair it with a simple green salad or crusty bread for a complete meal.
Pro Tips For Making Betty Crocker Old Fashioned Macaroni And Cheese
- Cook the Pasta Al Dente: DESCRIPTION: This isn’t just about taste—it’s about texture. The recipe calls for elbow macaroni, and if you pull it out mushy, the whole dish turns into glue. Test a piece at the 2-minute mark (yes, even if the box says 7-9). It should have a slight bite; drain it immediately and give it a quick shake in the colander to stop cooking.
- Grate the Cheese Fresh: DESCRIPTION: The recipe mixes sharp white cheddar and American cheese, but pre-shredded cheese is coated with anti-caking agents that make the sauce grainy. Use a box grater for the cheddar—it’s faster than you think—and buy a block of American cheese if you can find one. The difference in creaminess is night and day.
- Melt the Butter Slow: DESCRIPTION: The roux (butter + flour) is where the magic happens, but rushing it leads to lumps or a burnt flavor. Melt the butter over medium heat, then whisk in the flour all at once and cook for 2-3 minutes until it’s a pale golden color—not brown. This keeps the sauce from tasting raw or floury.
- Add Cheese in Stages: DESCRIPTION: Dumping all the cheese at once risks curdling or a clumpy mess. Start with half the sharp cheddar, stir until melted, then add the American cheese. Finish with the rest of the cheddar—this ensures a smooth, velvety texture without scrambling the sauce. (I learned this after making a lumpy batch that looked like cottage cheese.)
Serving suggestions for leftovers
Classic Side Pairings
This nostalgic macaroni and cheese pairs beautifully with a simple arugula salad tossed in 2 tablespoons lemon vinaigrette—the peppery bite cuts through the richness perfectly.
I like to use 4 cups baby arugula, 2 tablespoons olive oil, and 1 tablespoon fresh lemon juice with a pinch of Diamond Crystal kosher salt. For a heartier option, serve with crusty sourdough bread or garlic breadsticks to soak up every last cheesy bite. 🥗
Crunchy Add-Ins
Boost texture with ½ cup crispy fried onions (like French’s Golden Crisp) or ¼ cup toasted breadcrumbs mixed into the sauce before baking. For extra flair, sprinkle ¼ cup grated Parmesan cheese on top before broiling—it adds a salty, nutty contrast.
I also love adding ¼ cup cooked bacon bits for a smoky depth that elevates the dish. These add-ins transform it into a restaurant-worthy version. 🍞
Broiled Topping Variations
For a crispy finish, broil the dish for 1-2 minutes until the breadcrumbs turn golden brown. If you prefer a cheesy crust, top with ½ cup shredded mozzarella before broiling.
For a spicy kick, mix 1 teaspoon smoked paprika into the breadcrumbs or sprinkle red pepper flakes on top. The key is to watch closely—broilers vary, and you want light golden, not burnt. ✨
Kid-Friendly Serving Ideas
Turn this into a fun finger food by shaping the macaroni and cheese into mini muffins in a greased muffin tin, then broiling until golden. For picky eaters, serve with carrot sticks or cucumber slices on the side.
I also like making mac and cheese "boats" by scooping portions into hollowed-out bread rolls or phyllo cups for an interactive meal. Kids love assembling their own! 🧒
Adult Upgrades
Add 2 tablespoons white wine to the roux for a sophisticated twist, or stir in 1 teaspoon Dijon mustard for depth. For a smoky flavor, sprinkle ½ teaspoon chipotle powder into the cheese sauce.
Garnish with fresh parsley or chives for a pop of color. These tweaks make it feel like a gourmet dish without sacrificing the classic comfort. 🍷
Meal Prep Serving Tips
For leftovers, reheat covered in the oven at 350°F for 10-15 minutes to restore creaminess. To serve, transfer to a cast-iron skillet for a crispy bottom or a ceramic dish for easy sharing.
For potlucks, use a slow cooker on low for 1 hour to keep it warm and creamy. Always broil fresh portions for the best texture—reheating loses that golden crunch. ⏰
Nutrition facts
Frequently asked questions
Why does Betty Crocker's version use both sharp cheddar and American cheese?
The sharp cheddar delivers that signature tangy depth while the American cheese provides the signature creamy texture Betty Crocker perfected. The combination creates a perfectly balanced flavor profile that's both rich and smooth.
Can I make this macaroni and cheese without broiling it?
If you skip the broiler, simply stir in an extra 1 tablespoon of butter or splash of milk before serving. The dish will still be creamy and delicious—just without that crispy breadcrumb topping. For a quick alternative, sprinkle extra cheese on top and let it melt under the broiler for 1-2 minutes.
How do I fix lumpy cheese sauce?
If lumps appear, immediately remove the pan from heat and vigorously whisk in 1-2 tablespoons of cold milk or reserved pasta water. The cold liquid helps break up the cheese clumps. For prevention, always add cheese gradually while whisking constantly over low heat. A fine-mesh strainer can also help remove any stubborn lumps before serving.
What's the best way to reheat leftovers?
Cover with foil and warm in the oven at 350°F for 10-15 minutes to restore creaminess. For extra crispiness, broil for 1-2 minutes after reheating. Microwaving works in a pinch, but it can make the sauce watery—always stir in a splash of milk or butter to revive the texture. Leftovers keep well in the fridge for 3-4 days.
Can I substitute elbow macaroni with another pasta shape?
While elbow macaroni is traditional, you can use shells or penne for better sauce retention. Avoid long pasta like spaghetti—it won't hold the cheese sauce as well. If substituting, reduce cooking time by 1 minute to maintain al dente texture. The smaller surface area of elbow macaroni is key to that perfect cheesy coating.